目錄表
Ubuntu 20.04 / CentOS7 安裝 LibreNMS 程序
如果要以 Docker 方式進行安裝, 可參考 安裝 LibreNMS (Docker)
- Ubuntu 20.04 LTS
- CentOS Linux release 7.5.1804 (Core)
- Ubuntu 20.04 安裝程序
- CentOS7 安裝程序
載入中 ...
Ubuntu 20.04 安裝程序
- 安裝必要的套件
apt install software-properties-common
add-apt-repository universe
apt update
apt install acl curl composer fping git graphviz imagemagick mailutils mariadb-client mariadb-server mtr-tiny nginx-full nmap php7.4-cli php7.4-curl php7.4-fpm php7.4-gd php7.4-json php7.4-mbstring php7.4-mysql php7.4-snmp php7.4-xml php7.4-zip rrdtool snmp snmpd whois unzip python3-pip python3-pymysql python3-dotenv python3-redis python3-setuptools python3-systemd
- 新增 librenms 帳號
useradd librenms -d /opt/librenms -M -r -s "$(which bash)" - 下載 LibreNMS 系統
cd /opt
git clone https://github.com/librenms/librenms.git
- 設定 librenms 權限
chown -R librenms:librenms /opt/librenms
chmod 771 /opt/librenms
setfacl -d -m g::rwx /opt/librenms/rrd /opt/librenms/logs /opt/librenms/bootstrap/cache/ /opt/librenms/storage/
setfacl -R -m g::rwx /opt/librenms/rrd /opt/librenms/logs /opt/librenms/bootstrap/cache/ /opt/librenms/storage/
- 安裝 PHP 相關套件
su - librenms
./scripts/composer_wrapper.php install --no-dev
exit
- 安裝 php composer
wget https://getcomposer.org/composer-stable.phar
mv composer-stable.phar /usr/bin/composer
chmod +x /usr/bin/composer
- 設定時區資料
vi /etc/php/7.4/fpm/php.ini
vi /etc/php/7.4/cli/php.ini
:
date.timezone = "Asia/Taipei"
:
timedatectl set-timezone Asia/Taipei - 設定 MariaDB
vi /etc/mysql/mariadb.conf.d/50-server.cnf
--
[mysqld]
:
innodb_file_per_table=1
lower_case_table_names=0
:
--
systemctl enable mariadb
systemctl restart mariadb
- 修改 DB 密碼 Password
mysql -u root
--
CREATE DATABASE librenms CHARACTER SET utf8mb4 COLLATE utf8mb4_unicode_ci;
CREATE USER 'librenms'@'localhost' IDENTIFIED BY '**Password**';
GRANT ALL PRIVILEGES ON librenms.* TO 'librenms'@'localhost';
FLUSH PRIVILEGES;
exit
- 設定 PHP-FPM
cp /etc/php/7.4/fpm/pool.d/www.conf /etc/php/7.4/fpm/pool.d/librenms.conf
vi /etc/php/7.4/fpm/pool.d/librenms.conf
- 將 [www] 改成 [librenms]
- 將 user 和 group 改成 “librenms”
user = librenms
group = librenms
- 將 listen 改成 /run/php-fpm-librenms.sock
listen = /run/php-fpm-librenms.sock
- 設定 Nginx 改 server_name 為實際的網址或 IP Exp. 10.20.0.34
vi /etc/nginx/conf.d/librenms.confserver { listen 80; server_name 10.20.0.34; root /opt/librenms/html; index index.php; charset utf-8; gzip on; gzip_types text/css application/javascript text/javascript application/x-javascript image/svg+xml text/plain text/xsd text/xsl text/xml image/x-icon; location / { try_files $uri $uri/ /index.php?$query_string; } location ~ [^/]\.php(/|$) { fastcgi_pass unix:/run/php-fpm-librenms.sock; fastcgi_split_path_info ^(.+\.php)(/.+)$; include fastcgi.conf; } location ~ /\.(?!well-known).* { deny all; } }- 重新啟動 nginx
rm /etc/nginx/sites-enabled/default
systemctl restart nginx
systemctl restart php7.4-fpm
- 啟動 lnms
ln -s /opt/librenms/lnms /usr/bin/lnms
cp /opt/librenms/misc/lnms-completion.bash /etc/bash_completion.d/
- 設定 snmpd
cp /opt/librenms/snmpd.conf.example /etc/snmp/snmpd.conf
vi /etc/snmp/snmpd.conf
---
將 RANDOMSTRINGGOESHERE 改成自己的 snmp 密碼
com2sec readonly  default         RANDOMSTRINGGOESHERE
:
--
curl -o /usr/bin/distro https://raw.githubusercontent.com/librenms/librenms-agent/master/snmp/distro
chmod +x /usr/bin/distro
systemctl enable snmpd
systemctl restart snmpd
- 設定 crontab
cp /opt/librenms/librenms.nonroot.cron /etc/cron.d/librenms - 設定 logrotate
cp /opt/librenms/misc/librenms.logrotate /etc/logrotate.d/librenms - 開啟網頁進行設定 Exp. http://10.20.0.34
- 檢查設定
- 設定資料庫與匯入基本資料
- 建立管理者帳號密碼
- 如果有遇到問題可以執行以下語法進行檢測
sudo su - librenms
./validate.php
如果沒問題會顯示類似如下結果:
root@ct-librenms:/opt# sudo su - librenms
librenms@ct-librenms:~$ ./validate.php
====================================
Component | Version
--------- | -------
LibreNMS  | 21.4.0-3-gcea6f13bf
DB Schema | 2021_04_08_151101_add_foreign_keys_to_port_group_port_table (208)
PHP       | 7.4.3
Python    | 3.8.5
MySQL     | 10.3.25-MariaDB-0ubuntu0.20.04.1
RRDTool   | 1.7.2
SNMP      | NET-SNMP 5.8
====================================

[OK]    Composer Version: 2.0.12
[OK]    Dependencies up-to-date.
[WARN]  You have no devices.
        [FIX]:
        Consider adding a device such as localhost: /addhost
[OK]    Database connection successful
[OK]    Database schema correct
librenms@ct-librenms:~$
設定自動找尋區域網路內可納管設備
- 假設區網為 192.168.1.0/24 (192.168.1.1 - 192.168.1.254)
- SNMP 都是設定為 v1 / v2c , Community 設定為 public 或 ichiayi_snmp
- 先安裝 python-ipaddress 模組 yum install python-ipaddress
- 先手動加入一個設備進行監管 Exp. 192.168.1.1
- vi /opt/librenms/config.php
:
# Auto-Discovery
// v1 or v2c
$config['snmp']['community'][] = "public";
$config['snmp']['community'][] = "ichiayi_snmp";

$config['nets'][] = '192.168.1.0/24';

$config['autodiscovery']['nets-exclude'][] = '192.168.1.1/32';

$config['discovery_by_ip'] = true;
- 第一次可以手動執行一次
cd /opt/librenms
./snmp-scan.py
結果:
[root@ct-librenms librenms]# ./snmp-scan.py
Scanning IPs:
..............................................................................................................................................................................................................................................++++++++++-----

Scanned 253 IPs: 0 known devices, added 10 devices, failed to add 5 devices, 1 ips excluded by config
Runtime: 104.31 seconds
- 設定 default_poller_group = 1
lnms config:set default_poller_group 1 - 之後在區域網路內的新設備如果有啟用 snmp v1 / v2c communty 符合設定的值, 可以在五分鐘內被自動加入
- 前一陣子發現設定都正確, 使用 snmp-scan.py 確實可以自動加入, 但卻無法如預期由該機制將新設備自動加入, 找了一些文章後還是無法真正解決問題, 目前我的 workaround 方法是將 snmp-scan.py 直接加入 cron 來處理
設定告警通知
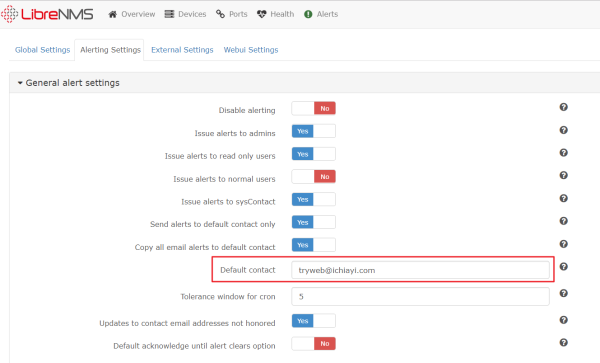
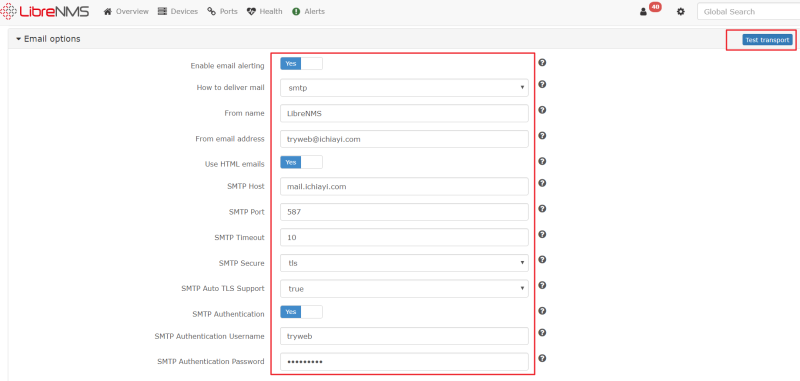
- 設定 E-Mail 通知
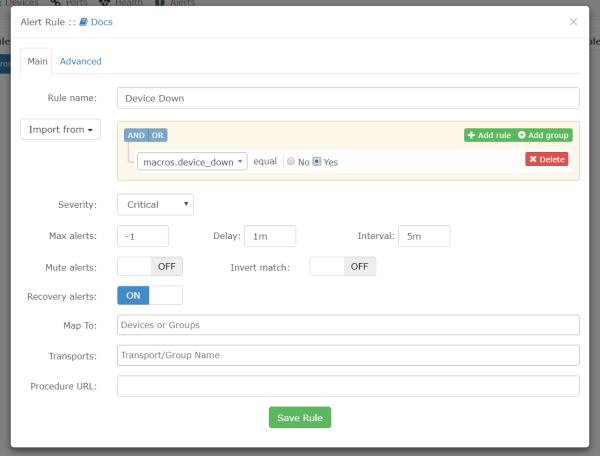
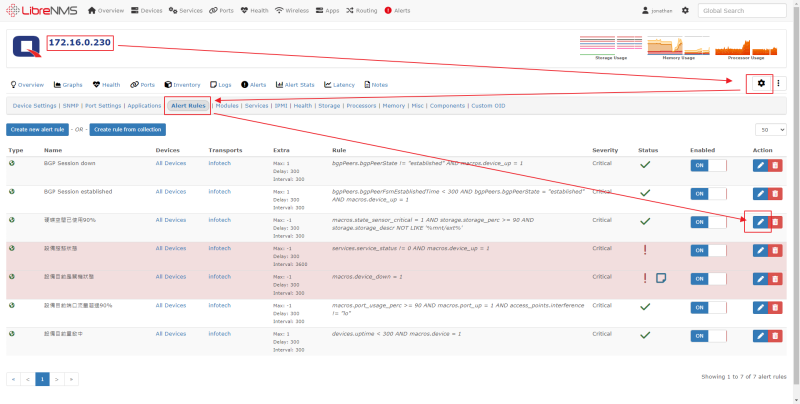
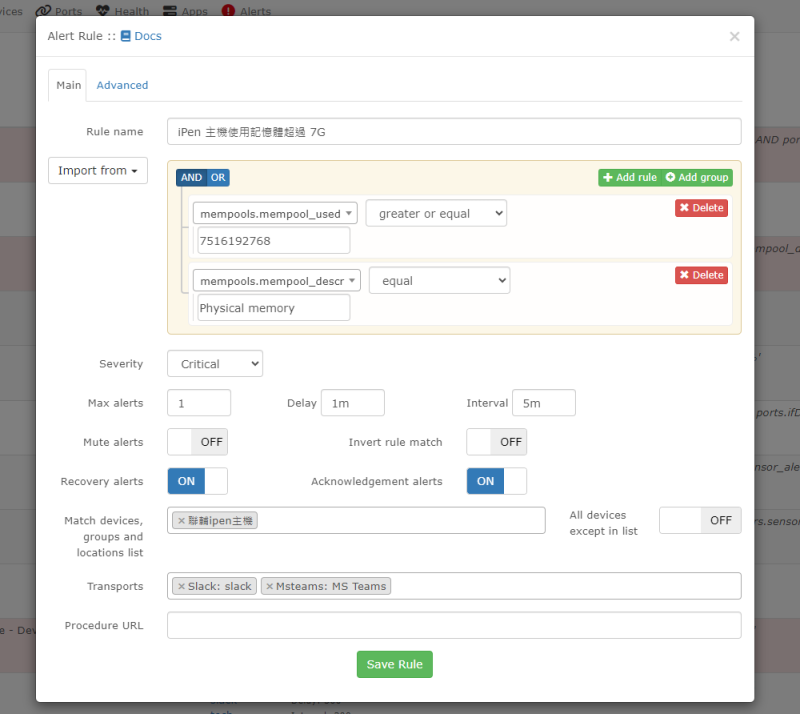
- 設定告警通知規則
設定 Device Dependencies 設備依存關係
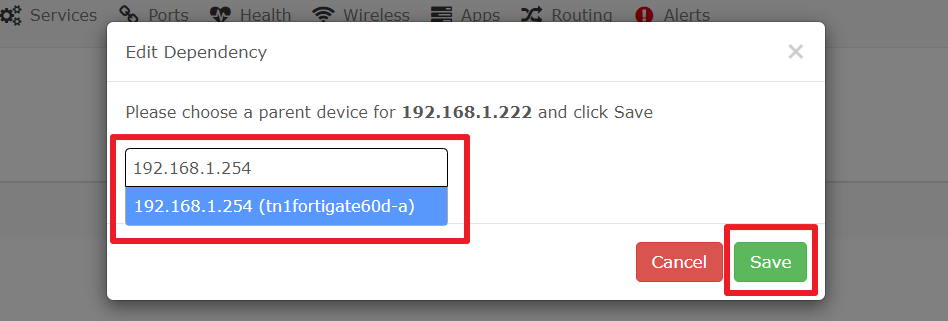
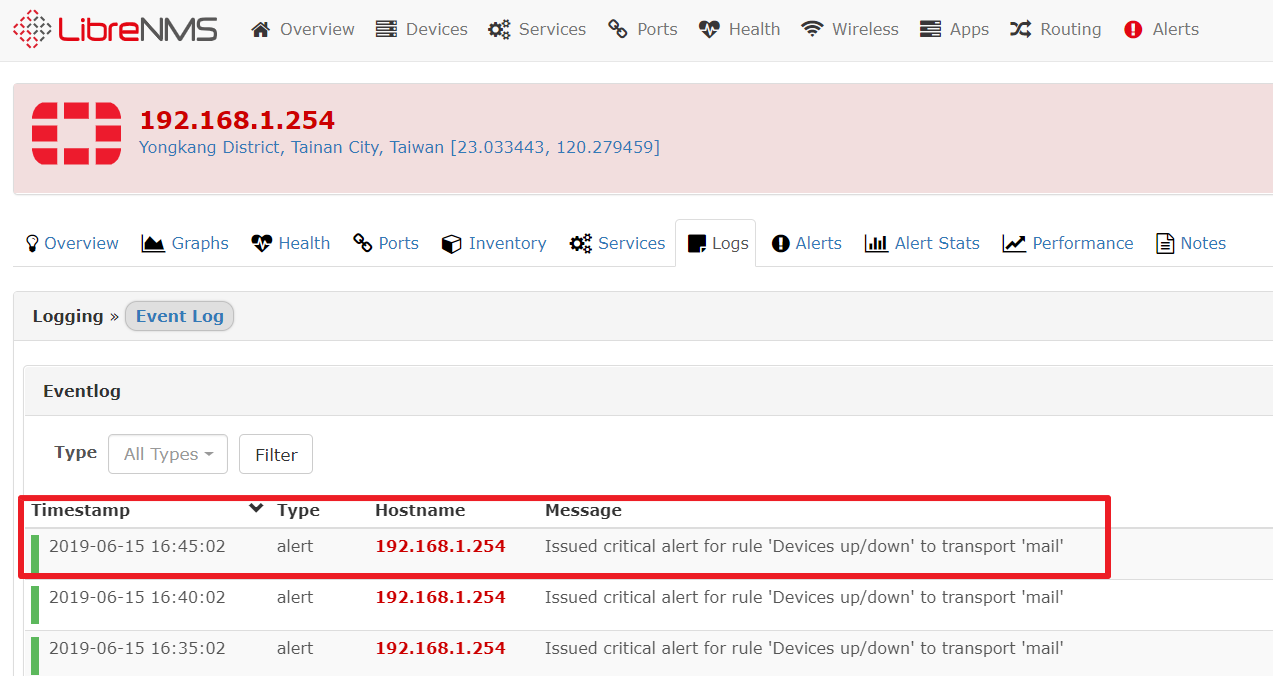
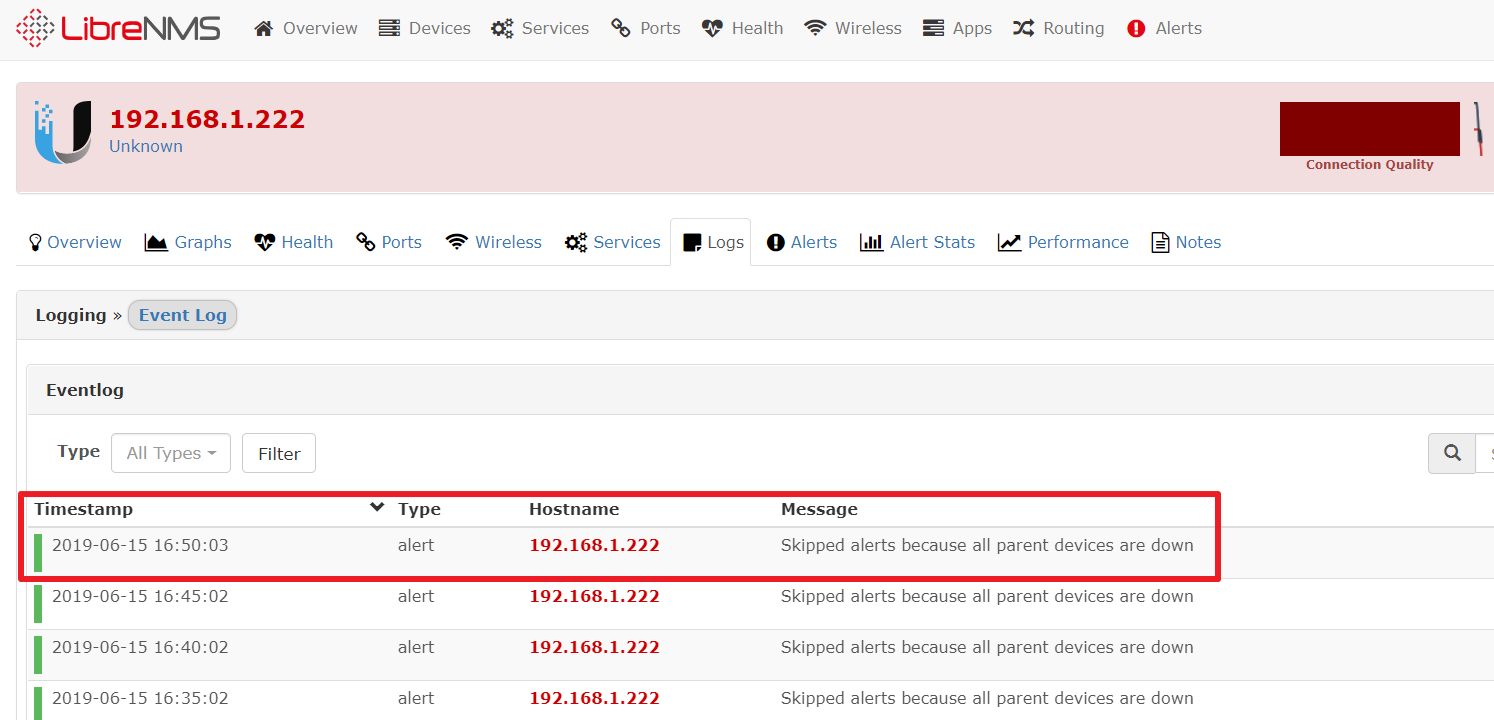
- Device Dependencies 可以減少不必要的告警通知, 例如 Firewall 故障, Firewall 內所有的主機當然無法使用, 此時可以設定裡面所有的主機的 Parents 是 Firewall 減少不必要的告警通知
- Exp. 192.168.1.254 是 Firewall, 192.168.1.222 是內部 Wifi 設備, 外部監控的 LibreNMS 可以設定 192.168.1.222 有個 Parents 是 192.168.1.254 可點下參考相關設定畫面
安裝 Agent 監看應用程式
- LibreNMS Agent 的安裝方式
- 安裝 Apache Agent 的方式
- 加裝 Nagios Plugin 增加監控能力
- 安裝 BIND(Named) Agent 的方式
- 加裝 Check_MK 增加監控能力
- nagios plugins - check_mssql_health
- 安裝 PVE (Proxmox Virtual Environment) Agent 的方式
- 安裝 fail2ban Agent 的方式
- 安裝 MySQL Agent 的方式
- 安裝 Nginx Agent 的方式
- 安裝 PHP-FPM Agent 的方式
- 安裝 postfix Agent 的方式
- 安裝 Redis Agent 的方式
- 安裝 SMART Agent 的方式
- 安裝 ZFS Agent 的方式
載入中 ...
LibreNMS Agent 的安裝方式
- CentOS 7 + systemd
- 這 Agent Listen TCP-Port 6556
- 需要驗證 LibreNMS 可以正確 TCP-Port 6556 連上 Agent 主機
- 複製 librenms-agent 儲存庫
cd /opt/
git clone https://github.com/librenms/librenms-agent.git
cd librenms-agent
cp check_mk_agent /usr/bin/check_mk_agent
chmod +x /usr/bin/check_mk_agent
cp [email protected] check_mk.socket /etc/systemd/system
mkdir -p /usr/lib/check_mk_agent/plugins /usr/lib/check_mk_agent/local
cp agent-local/* /usr/lib/check_mk_agent/local/
chmod a+x /usr/lib/check_mk_agent/local/*
systemctl enable check_mk.socket && systemctl start check_mk.socket
參考網址
常見 LibreNMS 異常問題排除
每日自動更版失敗處理
- 先透過執行 daily.sh 看錯誤訊息
su - librenms
./daily.sh
- 看錯誤訊息進行處理, Exp. git 檔案被更改, 就移除這些檔案後, 在執行 daily.sh
- 如果無法解決, 可以透過 validate.php 來檢查
./vaildate.php: [FAIL] Some folders have incorrect file permissions, this may cause issues. [FIX]: sudo chown -R librenms:librenms /opt/librenms sudo setfacl -d -m g::rwx /opt/librenms/rrd /opt/librenms/logs /opt/libr enms/bootstrap/cache/ /opt/librenms/storage/ sudo chmod -R ug=rwX /opt/librenms/rrd /opt/librenms/logs /opt/librenms/ bootstrap/cache/ /opt/librenms/storage/ Files: /opt/librenms/storage/framework/views/cdca770a337e07f2364ec770e7b408621 95170d7.php就依照內容說明去修正
su - root
chown -R librenms:librenms /opt/librenms
setfacl -d -m g::rwx /opt/librenms/rrd /opt/librenms/logs /opt/librenms/bootstrap/cache/ /opt/librenms/storage/
chmod -R ug=rwX /opt/librenms/rrd /opt/librenms/logs /opt/librenms/bootstrap/cache/ /opt/librenms/storage/
- 其他實用的修復 script:
- 修復 git 目錄檔案 ./scripts/github-remove
- 自動更新失敗, 出現很多套件依存議題, Exp,. Carbon 1 is deprecated, see how to migrate to Carbon 2
- 可重新完整安裝的程序如下:
su - librenms
./scripts/github-remove -d -v
git pull
./daily.sh
./validate.php
更新 python3
PHP 7.1 and Python 2 no longer supported
LibreNMS will soon require Python 3.5+ and PHP 7.2.5+. For more details check https://t.libren.ms/uo84c

2020-05-11 00:00:00 | Source: http://www.librenms.org/notifications.rss
yum install python36
修改連線 DB
- 因為資料庫變大, 改用 Percona XtraDB Cluster 來取代本機 MySQL/MariaDB, 修改 /opt/librenms/config.php 內的 ### Database config 卻完全沒用, 看了 LibreNMS 文件才發現已經變成要改 /opt/librenms/.env 才對
- 以下是 /opt/librenms/.env 大概的內容
APP_KEY=base64:LvIYs6Gauexxxxxxxxxxxxxxxxxxxxxxxxxxxxxx5/c=

DB_HOST=192.168.11.202
DB_DATABASE=librenms
DB_USERNAME=**dbuser**
DB_PASSWORD=**dbpasswd**

#APP_URL=
NODE_ID=5cxxxxxxxxxde
DB_PORT=3306
LIBRENMS_USER=librenms
- 原本 mariadb 的設定要關閉
systemctl stop mariadb
systemctl disable mariadb
CentOS 7 升級 php 至 7.4
- 2020/11/04 收到訊息會 2020/11 起, LibreNMS 必須使用 php 7.3 以上(建議 7.4)版本才會自動更新
- 先移除原本 PHP 7.2
systemctl stop php-fpm
yum remove php72w*
mv /etc/yum.repos.d/webtatic* /tmp/
- 將安裝 REMI 的 PHP 7.4 來因應
yum install https://rpms.remirepo.net/enterprise/remi-release-7.rpm
vi /etc/yum.repos.d/remi-php74.repo
:
[remi-php74]
:
enabled=1
:
yum install composer php php-cli php-common php-curl php-fpm php-gd php-mbstring php-mysqlnd php-process php-snmp php-xml php-zip
- 因為這方式是重新安裝 php 與相關套件, 所以 php.ini 與 nginx 的一些設定必須再次執行
- 修改 php.ini
vi /etc/php.ini: [Date] ; Defines the default timezone used by the date functions ; http://php.net/date.timezone date.timezone = Asia/Taipei :
- 修改 php-fpm 設定
vi /etc/php-fpm.d/www.conf: ;user = apache user = nginx : ;listen.owner = nobody ;listen.group = nobody ;listen.mode = 0660 listen.owner = nginx listen.group = nginx listen.mode = 0660 :
systemctl enable php-fpm
systemctl restart php-fpm
- 修改 nginx 設定
vi /etc/nginx/conf.d/librenms.conf: : location ~ \.php { include fastcgi.conf; fastcgi_split_path_info ^(.+\.php)(/.+)$; #fastcgi_pass unix:/var/run/php-fpm/php7.2-fpm.sock; fastcgi_pass 127.0.0.1:9000; } :systemctl restart nginx - 設定 ping 的執行權限
setcap cap_net_raw+ep /usr/sbin/fping
setcap cap_net_raw+ep /usr/sbin/fping6
- 驗證一下是否可以正常運作
su - librenms
./validate.php
./daily.sh
可能會出現一些 Call to undefined method … 訊息, 不過第二次執行 ./daily.sh 應該就不會再出現, 執行畫面如下
[root@ct-librenms ~]# su - librenms
-bash-4.2$ ./validate.php
====================================
Component | Version
--------- | -------
LibreNMS  | 1.69-5-g240edd2
DB Schema | 2020_07_27_00522_alter_devices_snmp_algo_columns (188)
PHP       | 7.4.12
Python    | 3.6.8
MySQL     | 5.6.42-84.2-56-log
RRDTool   | 1.4.8
SNMP      | NET-SNMP 5.7.2
OpenSSL   |
====================================

[OK]    Composer Version: 1.10.17
[OK]    Dependencies up-to-date.
[OK]    Database connection successful
[OK]    Database schema correct
-bash-4.2$ ./daily.sh
Supported PHP and Python version, switched back to master branch. OK
Updating to latest codebase                        OK

In AppServiceProvider.php line 43:

  Call to undefined method Illuminate\Pagination\Paginator::useBootstrap()

In AppServiceProvider.php line 43:

  Call to undefined method Illuminate\Pagination\Paginator::useBootstrap()

Updating Composer packages                         OK
Updated from bc02ab3 to 240edd2                    OK
Updating SQL-Schema                                OK
Updating submodules                                OK
Cleaning up DB                                     OK
Fetching notifications                             OK
Caching PeeringDB data                             OK
-bash-4.2$ ./daily.sh
Updating to latest codebase                        OK
Updating Composer packages                         OK
Updating SQL-Schema                                OK
Updating submodules                                OK
Cleaning up DB                                     OK
Fetching notifications                             OK
Caching PeeringDB data                             OK
- 移轉 LibreNMS 程序可參考 https://docs.librenms.org/Support/FAQ/ 內
How do I move my LibreNMS install to another server?
CentOS 7 升級 MariaDB 10
- 2021/06/13 發現 Librenms 無法運作, 才發現 2021/03 起只支援 MySQL version 5.7.7 以上的版本, 所以目前使用的 Percona XtraDB Cluster 內的 5.6.42 就被迫要升級改用 MariaDB 10.5
- 將舊資料匯出, 如果忘記資料庫連線資訊, 可以看一下 .env
su - librenms
head .env
Exp. db_host:192.168.11.21 , db_user:librenms , db_pass:Password , db_name:librenms
mysqldump -u librenms -p librenms -h 192.168.11.21> /tmp/librenms.sql - 在新資料庫建立 LibreNMS 的使用者與資料庫
mysql -u root -p
create database librenms;
create user 'librenms'@'%' identified by '**Password**';
grant all on librenms.* to 'librenms'@'%';
flush privileges;
quit
- 將舊資料匯入新資料庫 Exp. 192.168.11.22
cat /tmp/librenms.sql | mysql -u librenms -p librenms -h 192.168.11.22 - 修改 .env 內 DB 的連線設定
su - librenms
vi .env
./lnms migrate 出現 SQLSTATE[42S01] 異常
- 出現錯誤訊息如下
In Connection.php line 678:

  SQLSTATE[42S01]: Base table or view already exists: 1050 Table 'port_groups' already exists (SQL: create table `port_groups` (`id` int unsigned not null auto_increment primary key, `na
  me` varchar(255) not null, `desc` varchar(255) null) default character set utf8mb4 collate 'utf8mb4_unicode_ci')
- 解決方式
mysql -u librenms -p librenms
drop table port_groups;
- 再次執行 ./lnms migrate 出現找不到 librenms.port_group_port 這 table
In Connection.php line 678:

  SQLSTATE[42S02]: Base table or view not found: 1146 Table 'librenms.port_group_port' doesn't exist (SQL: alter table `port_group_port` add constraint `port_group_port_port_group_id_for
  eign` foreign key (`port_group_id`) references `port_groups` (`id`) on delete CASCADE)
- 解決方式 :
mysql -u librenms -p librenms
CREATE TABLE port_group_port (
port_group_id int(10) unsigned NOT NULL,
port_id int(10) unsigned NOT NULL,
PRIMARY KEY (port_group_id,port_id),
KEY port_group_port_port_group_id_index (port_group_id),
KEY port_group_port_port_id_index (port_id),
CONSTRAINT port_group_port_port_group_id_foreign FOREIGN KEY (port_group_id) REFERENCES port_groups (id) ON DELETE CASCADE,
CONSTRAINT port_group_port_port_id_foreign FOREIGN KEY (port_id) REFERENCES ports (port_id) ON DELETE CASCADE
) ENGINE=InnoDB DEFAULT CHARSET=utf8mb4 COLLATE=utf8mb4_unicode_ci;
- 再次執行 ./lnms migrate 就可以修正成功
- 再執行 ./validate.php 看有其他那些問題, 依照說明的語法進行修正 Exp.
su - root
setcap cap_net_raw+ep /usr/sbin/fping6
sudo ln -s /opt/librenms/lnms /usr/bin/lnms
sudo cp /opt/librenms/misc/lnms-completion.bash /etc/bash_completion.d/
sudo chown -R librenms:librenms /opt/librenms
sudo setfacl -d -m g::rwx /opt/librenms/rrd /opt/librenms/logs /opt/librenms/bootstrap/cache/ /opt/librenms/storage/
sudo chmod -R ug=rwX /opt/librenms/rrd /opt/librenms/logs /opt/librenms/bootstrap/cache/ /opt/librenms/storage/
由 CentOS 7 移轉至 Ubuntu 20.04
- 依照正常程序安裝 LibreNMS 在 Ubuntu 20.04 上
- 修改 CentOs 7 與 Ubuntu 20.04 新舊主機內的 /etc/cron.d/librenms 停止 cron 執行
vi /etc/cron.d/librenms: #33 */6 * * * librenms /opt/librenms/cronic /opt/librenms/discovery-wrapper.py 1 #*/5 * * * * librenms /opt/librenms/discovery.php -h new >> /dev/null 2>&1 #*/5 * * * * librenms /opt/librenms/cronic /opt/librenms/poller-wrapper.py 16 #* * * * * librenms /opt/librenms/alerts.php >> /dev/null 2>&1 #*/5 * * * * librenms /opt/librenms/poll-billing.php >> /dev/null 2>&1 #01 * * * * librenms /opt/librenms/billing-calculate.php >> /dev/null 2>&1 #*/5 * * * * librenms /opt/librenms/check-services.php >> /dev/null 2>&1 #* * * * * librenms cd /opt/librenms/ && php artisan schedule:run >> /dev/null 2>&1 : #15 0 * * * librenms /opt/librenms/daily.sh >> /dev/null 2>&1
- 在 CentOS 7 舊主機內將 MySQL 資料匯出
mysqldump librenms -u root -p > librenms.sql
- 在 Ubuntu 20.04 新主機將 librenms.sql 匯入
scp [email protected]:/root/librenms.sql .
mysql -u root -p librenms < librenms.sql
- 將 CentOS 7 舊主機內的 rrd 目錄內的檔案複製到 Ubuntu 20.04 新主機內, @CentOs 7
cd /opt/librenms/
tar cvf rrd.tar rrd
@Ubuntu 20.04
cd /opt/librenms/
scp [email protected]:/opt/librenms/rrd.tar .
tar xvf rrd.tar
- 將 CentOS 7 舊主機內的 .env 和 config.php 檔案複製到 Ubuntu 20.04 新主機內, @Ubunutu 20.04
cd /opt/librenms/
scp [email protected]:/opt/librenms/.env .
scp [email protected]:/opt/librenms/config.php .
chown -R librenms:librenms /opt/librenms
- 檢查 Ubuntu 20.04 新主機內的安裝狀態
su - librenms
./validate.php
- 修改 Ubuntu 20.04 新主機內的 /etc/cron.d/librenms 啟動 cron 執行
vi /etc/cron.d/librenms: 33 */6 * * * librenms /opt/librenms/cronic /opt/librenms/discovery-wrapper.py 1 */5 * * * * librenms /opt/librenms/discovery.php -h new >> /dev/null 2>&1 */5 * * * * librenms /opt/librenms/cronic /opt/librenms/poller-wrapper.py 16 * * * * * librenms /opt/librenms/alerts.php >> /dev/null 2>&1 */5 * * * * librenms /opt/librenms/poll-billing.php >> /dev/null 2>&1 01 * * * * librenms /opt/librenms/billing-calculate.php >> /dev/null 2>&1 */5 * * * * librenms /opt/librenms/check-services.php >> /dev/null 2>&1 * * * * * librenms cd /opt/librenms/ && php artisan schedule:run >> /dev/null 2>&1 : 15 0 * * * librenms /opt/librenms/daily.sh >> /dev/null 2>&1
升級 php 至 8.1 以上版本
- 今天看到這訊息
Error: PHP version too low
PHP version 8.1 is the minimum supported version as of September, 2022. We recommend you update to PHP a supported version of PHP (8.1 suggested) to continue to receive updates. If you do not update PHP, LibreNMS will continue to function but stop receiving bug fixes and updates.
2022-09-27 00:00:00 | Source: daily.sh
- 檢查作業系統 → Ububtu 20.04 / php 7.4 / nginx 1.18
root@ct-librenms:~# cat /etc/issue
Ubuntu 20.04.4 LTS \n \l
root@ct-librenms:~# php -v
PHP 7.4.3 (cli) (built: Jun 13 2022 13:43:30) ( NTS )
Copyright (c) The PHP Group
Zend Engine v3.4.0, Copyright (c) Zend Technologies
    with Zend OPcache v7.4.3, Copyright (c), by Zend Technologies
root@ct-librenms:~# nginx -v
nginx version: nginx/1.18.0 (Ubuntu)
- 進行升級 ref - https://www.linuxcapable.com/how-to-install-php-8-1-on-ubuntu-20-04/
apt update && apt upgrade -y
apt install software-properties-common && add-apt-repository ppa:ondrej/php -y
apt update && apt upgrade -y
apt install php8.1 php8.1-fpm php8.1-cli php8.1-gd php8.1-curl php8.1-dom php8.1-xml php8.1-mysql php8.1-mbstring -y
apt autoremove -y
systemctl status php8.1-fpm
systemctl restart nginx
root@ct-librenms:~# php --version
PHP 8.1.10 (cli) (built: Sep 18 2022 10:25:43) (NTS)
Copyright (c) The PHP Group
Zend Engine v4.1.10, Copyright (c) Zend Technologies
    with Zend OPcache v8.1.10, Copyright (c), by Zend Technologies
- 更換 php-fpm 的版本設定
- 查看目前啟動的 php-fpm 狀況
root@ct-librenms:~# ps -ef |grep php-fpm
root         133       1  0 09:05 ?        00:00:00 php-fpm: master process (/etc/php/7.4/fpm/php-fpm.conf)
root         134       1  0 09:05 ?        00:00:00 php-fpm: master process (/etc/php/8.1/fpm/php-fpm.conf)
www-data     161     134  0 09:05 ?        00:00:00 php-fpm: pool www
www-data     163     134  0 09:05 ?        00:00:00 php-fpm: pool www
:
- 關閉 7.4 版的 php-fpm
root@ct-librenms:~# systemctl stop php7.4-fpm.service
root@ct-librenms:~# systemctl disable php7.4-fpm.service
Synchronizing state of php7.4-fpm.service with SysV service script with /lib/systemd/systemd-sysv-install.
Executing: /lib/systemd/systemd-sysv-install disable php7.4-fpm
Removed /etc/systemd/system/multi-user.target.wants/php7.4-fpm.service.
- 確認 8.4 版的 php-fpm socket 檔案
root@ct-librenms:/etc/nginx/conf.d# ls -lt /run/php/php
php-fpm.sock     php8.1-fpm.pid   php8.1-fpm.sock
root@ct-librenms:/etc/nginx/conf.d# ls -lt /run/php/php-fpm.sock
lrwxrwxrwx 1 root root 30 Sep 29 09:05 /run/php/php-fpm.sock -> /etc/alternatives/php-fpm.sock
root@ct-librenms:/etc/nginx/conf.d# ls -lt /run/php/php8.1-fpm.sock
srw-rw---- 1 www-data www-data 0 Sep 29 09:05 /run/php/php8.1-fpm.sock
所以只要設定是 /run/php/php-fpm.sock 就可以正確連上 8.4 版 php-fpm
- 將 nginx 內的 librenms 網站設定改用新板 php-fpm
vi /etc/nginx/conf.d/librenms.conf: } location ~ [^/]\.php(/|$) { fastcgi_pass unix:/run/php/php-fpm.sock; fastcgi_split_path_info ^(.+\.php)(/.+)$; : - 重啟 nginx
systemctl restart nginx.service - 執行 librenms 的設定檢查
su - librenms
./validate.php
librenms@ct-librenms:~$ ./validate.php
====================================
Component | Version
--------- | -------
LibreNMS  | 22.9.0-5-g66790e7e8
DB Schema | 2022_09_03_091314_update_ports_adsl_table_with_defaults (246)
PHP       | 8.1.11
Python    | 3.8.10
Database  | MariaDB 10.3.34-MariaDB-0ubuntu0.20.04.1
RRDTool   | 1.7.2
SNMP      | 5.8
====================================

[OK]    Composer Version: 2.4.2
[OK]    Dependencies up-to-date.
:
:
OK]    Database schema correct
[FAIL]  Time between this server and the mysql database is off
 Mysql time 2022-10-04 18:40:56
 PHP time 2022-10-04 10:40:56
[FAIL]  Missing PHP extension: mbstring
        [FIX]:
        Please install mbstring
[FAIL]  You have no timezone set for php.
        [FIX]:
        https://php.net/manual/en/datetime.configuration.php#ini.date.timezone
[OK]    Active pollers found
:
[OK]    rrdtool version ok
[WARN]  Your install is over 24 hours out of date, last update: Mon, 26 Sep 2022 13:52:15 +0000
        [FIX]:
        Make sure your daily.sh cron is running and run ./daily.sh by hand to see if there are any errors.
[WARN]  Your local git contains modified files, this could prevent automatic updates.
        [FIX]:
        You can fix this with ./scripts/github-remove
        Modified Files:
         bootstrap/cache/.gitignore
         logs/.gitignore
         storage/app/.gitignore
         storage/app/public/.gitignore
         storage/debugbar/.gitignore
         storage/framework/cache/.gitignore
         storage/framework/cache/data/.gitignore
         storage/framework/sessions/.gitignore
         storage/framework/testing/.gitignore
         storage/framework/views/.gitignore
         storage/logs/.gitignore
[FAIL]  We have found some files that are owned by a different user than 'librenms', this will stop you updating automatically and / or rrd files being updated causing graphs to fail.
        [FIX]:
        sudo chown -R librenms:librenms /opt/librenms
        sudo setfacl -d -m g::rwx /opt/librenms/rrd /opt/librenms/logs /opt/librenms/bootstrap/cache/ /opt/librenms/storage/
        sudo chmod -R ug=rwX /opt/librenms/rrd /opt/librenms/logs /opt/librenms/bootstrap/cache/ /opt/librenms/storage/
        Files:
         /opt/librenms/logs/.librenms.log.swp
- 依照上述的修正建議進行修正
su - root
vi /etc/php/8.1/fpm/php.ini
----
:
[Date]
; Defines the default timezone used by the date functions
; https://php.net/date.timezone
date.timezone = "Asia/Taipei"
:
----
vi /etc/php/8.1/cli/php.ini
----
:
[Date]
; Defines the default timezone used by the date functions
; https://php.net/date.timezone
date.timezone = "Asia/Taipei"
:
----
su - librenms
./daily.sh
./scripts/github-remove -d
su - root
chown -R librenms:librenms /opt/librenms
chmod -R ug=rwX /opt/librenms/rrd /opt/librenms/logs /opt/librenms/bootstrap/cache/ /opt/librenms/storage/
usermod -a -G librenms www-data
su - librenms
librenms@ct-librenms:~$ ./validate.php
===========================================
Component | Version
--------- | -------
LibreNMS  | 22.9.0-34-ge4fdbbd82 (2022-10-04T01:55:49+08:00)
DB Schema | 2022_09_03_091314_update_ports_adsl_table_with_defaults (246)
PHP       | 8.1.11
Python    | 3.8.10
Database  | MariaDB 10.3.34-MariaDB-0ubuntu0.20.04.1
RRDTool   | 1.7.2
SNMP      | 5.8
===========================================

[OK]    Composer Version: 2.4.2
[OK]    Dependencies up-to-date.
[OK]    Database connection successful
[OK]    Database Schema is current
[OK]    SQL Server meets minimum requirements
[OK]    lower_case_table_names is enabled
[OK]    MySQL engine is optimal
[OK]
[OK]    Database schema correct
[OK]    MySQl and PHP time match
[OK]    Active pollers found
[OK]    Dispatcher Service not detected
[OK]    Locks are functional
[OK]    Python poller wrapper is polling
[OK]    Redis is unavailable
[OK]    rrd_dir is writable
[OK]    rrdtool version ok
