有關 FortiGate 防火牆相關設定
- 設備型號 : FortiGate 40C (v5.2.13,build762)
- WAN1 : 220.100.100.100 GW: 220.100.100.254
- LAN(Internal) : 192.168.0.1
基本設定
- 設定 WAN1 (wan1)
- 設定 LAN (intrtnal)
- 設定 Default Route
- System → Network → Routing
- Create New :
- Destination IP/Mask : 0.0.0.0/0.0.0.0
- Device : wain1
- Gateway : 220.100.100.254
- Policy & Objects → Policy → IPV4
- Create New :
- Incoming Interface : internal
- Source Address : all
- Outgoing Interface : wan1
- Destination Address : all
- Schedule : always
- Service : ALL
- Action : ACCEPT
設定 Port Mapping
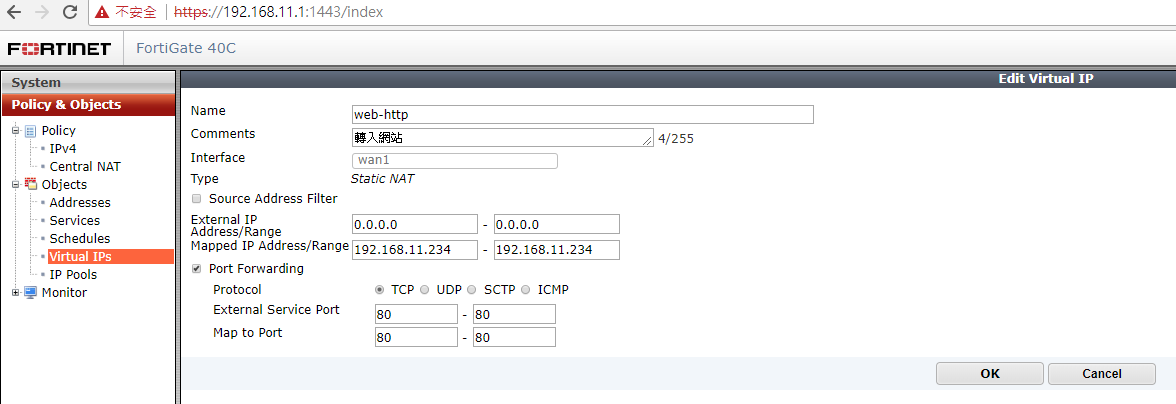
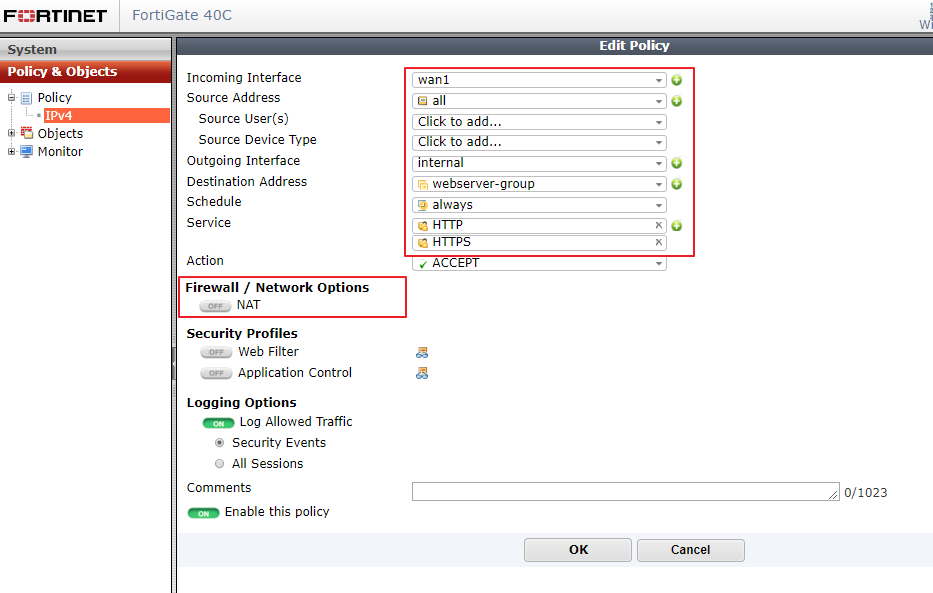
- 預計設定 WAN1 的 Port 80 / 443 → 192.168.0.200:80 / 443
- 定義 VIP : Polocy & Objects → Objects → Virtual IPs
- 定義 Policy : Policy & Objects → Policy → IPv4
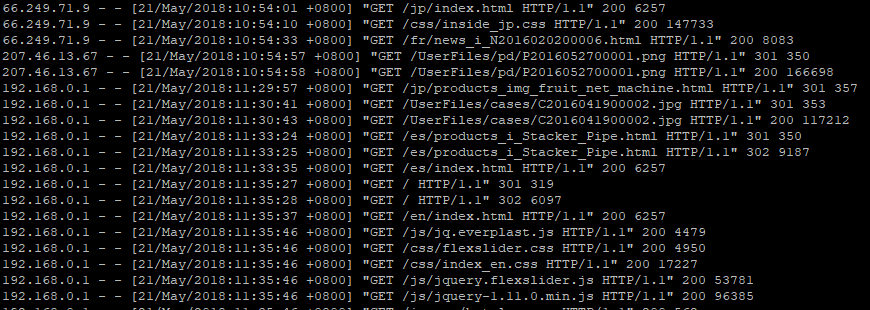
- 如果 Policy 中有啟動 NAT 轉過去的內部 Server 來源 IP 就會是 Fortigate 的 IP
- Exp. Fortigate 的 internal IP 是 192.168.0.1 在 21/May/2018:11:29:57 切換成有 NAT 的規則, 結果 Web Server Log 內看到的來源 IP 都變成 192.168.0.1 看畫面
針對 Port Mapping (WAN 連入 Internal) (Virtual IP) 特定來源(黑名單)IP 設定技巧
- 透過 UI 設定 WAN → Internal 的 Deny 規則後, 是無法實際阻擋特定來源 IP
- 但使用命令方式, 針對這 Policy 編號進行設定, 增加 “set match-vip enable” 才能真正阻擋.
設定 SSL VPN
- 建立使用者 :
- User & Device → User → User Group
- Create New :
- Name : vpn-user
- Type : Firewall
- User & Device → User → User Definition
- Create New :
- User Type : Local User
- Login Credentials :
- User Name : vpnuser1
- Password : password1
- Contact Info :
- Email Address : [email protected]
- Extra Info :
- [V] Enable
- [ ] Two-factor Authentication
- [V] User Group : vpn-user
- VPN → SSL → Portals
- Create New1) :
- Name : ichiayi-sslvpn
- [V] Enable Tunnel Mode
- [V] Enable Split Tunneling
- Routing Address : SSLVPN_TUNNEL_ADDR1
- Source IP Pooles : SSLVPN_TUNNEL_ADDR1
- Client Options : [V] A;ways Up (Keep Alive)
- [V] Enable Web Mode
- Portal Message : Welcome to SSL VPN Service
- 設定帳號一次只能一個連線 :
- VPN → SSL → Portals → 選擇指定的項目 Exp. full-access → Edit
- [V] Limit Users to One SSL-VPN Connection at a Time
防止暴力登入 SSL VPN 方式
- 當 Log & Report 的 VPN Events 出現大量 ssl-login-fail , sslvpn_login_unknown_user 狀況
- 設定當 SSL VPN 登入失敗超過 x 次就鎖定 n 秒, 來降低嘗試暴力登入的狀況 Exp. 失敗超過 3 次, 就鎖 3600 秒
config vpn ssl settings
    set login-attempt-limit 3
    set login-block-time 3600
end
IPSec - L2TP 用戶撥入 VPN 設定
設定多條 WAN 備援方式
路由偵錯檢測方式
- 連上 Fortigate 查看有經過這 FW 的 IP 流量訊息 Exp. 192.168.0.250
diag debug reset
diag debug flow filter clear
diagnose sniffer packet any "host 192.168.0.250 and icmp" 4
- 可以在外部 192.168.1.140 的 Windows 10 PC 執行 ping 與 tracert , 只要有經過 Fortigate 就會顯示流量訊息
- ping 範例 PC 端 Fortigate 端
- tracert 範例 PC 端 Fortigate 端
FortiGate 60D 特別設定
端對端 VPN 使用 traceroute 非預期出現 DMZ IP
- 參考 - http://kb.fortinet.com/kb/microsites/search.do?cmd=displayKC&docType=kc&externalId=FD36799&sliceId=1&docTypeID=DT_KCARTICLE_1_1&dialogID=116930985&stateId=0%200%20116932943
traceroute 192.168.1.5

traceroute to 192.168.1.5 (192.168.1.5), 30 hops max, 60 byte packets
 1  192.168.0.254 (192.168.0.254)  4.692 ms  4.602 ms  4.524 ms
 2  60-248-245-172.HINET-IP.hinet.net (60.248.245.172)  14.593 ms  14.556 ms  14.483 ms
 3  192.168.1.5 (192.168.1.5)  20.283 ms  20.285 ms  20.261 ms
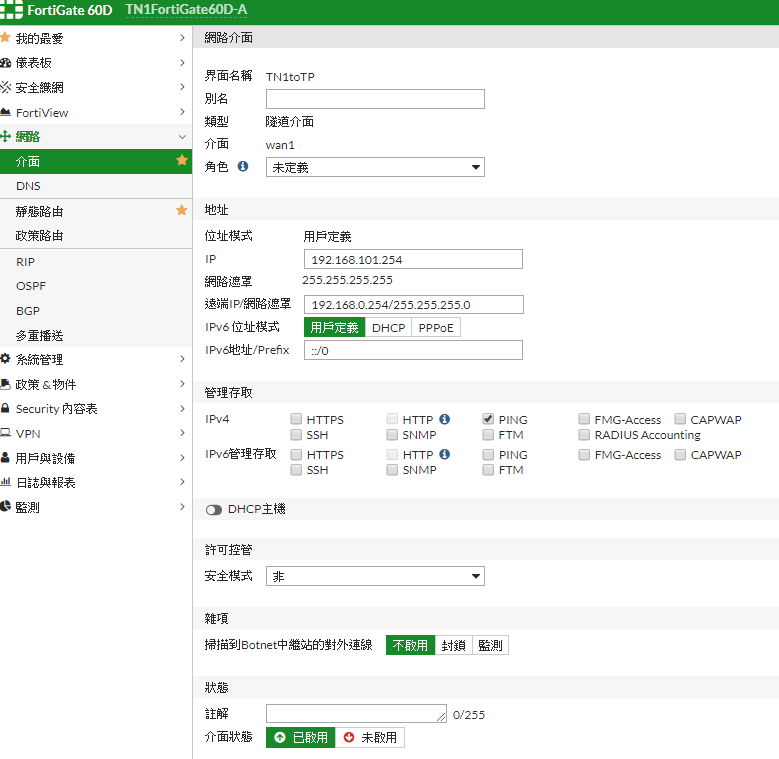
- 只要設定 VPN 虛擬介面的 IP 即可解決 Exp. 192.168.101.254 看畫面
traceroute 192.168.1.5
traceroute to 192.168.1.5 (192.168.1.5), 30 hops max, 60 byte packets
 1  192.168.0.254 (192.168.0.254)  4.586 ms  4.502 ms  4.412 ms
 2  192.168.101.254 (192.168.101.254)  15.170 ms  15.092 ms  13.887 ms
 3  192.168.1.5 (192.168.1.5)  16.199 ms  16.203 ms  16.184 ms
FortiGate 40C 特別設定
啟動 SNMP
建立 VLAN
設定 HA
- 參考手冊 - fortigate-ha-56.pdf
- 設定前確認
- 預計設定的 HA 架構與模式
- 設定 HA 的模式 : FGCP Active-Active HA (這模式最多可以設定到四台 FortiGate3))
- 設定方式
- 如果對自動選擇的 Master 不滿意, 可以透過設定 priority 來指定(越大的數值優先當 Master) Exp. CLI語法
- 取消(解除) HA 設定
參考網址
<html><a href=“https://www.everplast.com.tw/product/machine/extruder-machine/”>Everplast – Extruder Machine</a></html>


